Setup and Processing of a 1D 13C NMR spectrum
SAFETY PRECAUTIONS: Due to the strong magnetic fields
- Persons wearing PACEMAKERS may not enter the immediate area of the magnets.
- No Steel objects (gas cylinders, storage dewars, tools, watches, keys etc.) should come within two meters of the magnets.
- Keep magnetic devices (e.g. atm and credit cards, magnetic data storage devices) away from the magnets.
This protocol is meant as a reminder as to the steps involved in setting up this type of experiment and in no way replaces the requirement for training and approval from the Facility Manager.
The setup of the Carbon 1D is very similar to that of the Proton 1D, however, the user needs to realize that 13C natural abundance is just 1.07% (versus 99.98% for 1H) and has an overall sensitivity that is ~1.4 x10⁻⁴ that of 1H’s. This means that on a sample where a decent 1D 1H spectrum can be acquired with 8 scans in less than 30 seconds an equivalent quality 13C spectrum needs 20-40,000 scans and 12-16 hours. Therefore, to make best use of spectrometer time, the 13C 1D’s are usually run overnight, therefore, it is essential to tune and shim the sample optimaly to get the best spectrum possible. As noted below it is best to wait and do preliminary processing of the spectrum after the first few dozen scans to be sure it is worth taking over the instrument for the entire night. Note that overnight runs are usually done on the 300 MHz instruments so that the 500 MHz is available for walk up use at all times but in situations where greater sensitivity and/or resolution are required the 500 MHz may be used. Please consult with the Facility Manager in these cases.
- Log into your account, click on TOPSPIN icon to start program. Click on lock icon to open lock display (or type “lockdisp” enter).
- Press the “ lock” button on the keypad ( to turn off the lock) and then the “lift off” button to eject the sample. Put your sample in a blue spinner and set the sample to correct depth using wall mounted gauge. Remove the other sample from top of magnet and place in you sample. Press the “lift off” button again to insert sample. Remove the spinner from the previous sample and put the sample in the rack or beaker and the spinner upside down on the desk.
- Type “new” and enter a file name in the pop-up window then save it.
- Type “rpar carbon all” to load in carbon 1d experiment parameters. Type “ii” initialize interface to reset the hardware to the correct frequency.
- Type “rsh aa_best”
- Locking: Type “lock” and select the appropriate solvent from the list that appears, wait for the "lock fineished " message before proceeding.
- Shimming: to begin shimming, press the “z” button and turn the knob until the lock signal reaches a maximum value (if it goes off-screen select the “lock gain” button and turn it until the lock signal is at 2/3 of the lock window then reselect the “z” button). When the “z” button has reached its maximum value select “z2” and turn the knob until the lock signal max’s out. Since the optimal “ z” and “z2” values are interdependent you need to go back and forth between “z” and “z2” until no further gains for the lock signal are made.
- On the 300 dpx (yellow) type “wobb” and “a” and the tuning signal will appear on screen. For 13C experiments use the hanging tool to adjust the sliders on the probe to the values on the information card and fine adjust those sliders to put the wobb signal into the bottom-centre. Note that the tuning equipment is delicate and should never be forced. When finished tuning type "stop" and return to the standard screen.
- Type “rga”, this automatically sets receiver gain, and then “zg” which zeros any previous data and starts the experiment.
-
For the 1D carbon experiment the default number of scans is 50,000 which would take greater than 24 hours to accumulate. To make the best use of instrument time you should check on the spectrum after a few dozen scans, at this point there will likely be a very large solvent peak and smaller peaks near the noise level from your sample, if there are no solute signals visible at all after 500-1000 scans it is likely that your sample is too dilute and that an overnight run is a waste of everyone’s time. On the other hand if the sample is very concentrated and the spectrum already is at the signal noise desired it is courteous to terminate the experiment early so that others can use the instrument. To check the spectrum without stopping the data collection type “tr” (which transfers the data to a file so it can be processed without stopping the overall data collection), then type “efp” to process the spectrum. If the requisite signal to noise is achieved before the 50,000 scans of the experiment have been collected type”halt”, this transfers the data and stops the data collection.
DO NOT TYPE “stop” BEFORE THE FULL NUMBER OF SCANS ARE COLLECTED OR THE DATA WILL NOT BE SAVED, TYPE "halt" INSTEAD.
In general overnight experiments will be halted at about 9 am the next morning and saved by the facility manager. Since the data is not saved until the experiment completes any power issues that occur overnight can result in the complete loss of the data set, to avoid this instead of typing "zg" to start the experiment you can type"overnight" which activates a macro that starts the experiment and saves it every hour. - Processing(simple version): when experiment is finished type ”ef” to fourier transform and apodize the data.
- Type “apk” to phase the data and “abs” to smooth the baseline, and pick peaks . Plot or got XWINPLOT.
- Finishing: when finished please return the deuterated benzene sample to the magnet and lock to "c6d6", wait until the "lock finished" message appears in the TOPSPIN window below the command line.
Setup and Processing of a 1D Proton NMR spectrum
SAFETY PRECAUTIONS: Due to the strong magnetic fields
- Persons wearing PACEMAKERS may not enter the immediate area of the magnets.
- No Steel objects (gas cylinders, storage dewars, tools, watches, keys etc.) should come within two meters of the magnets.
- Keep magnetic devices (e.g. atm and credit cards, magnetic data storage devices) away from the magnets.
This protocol is meant as a reminder as to the steps involved in setting up this type of experiment and in no way replaces the requirement for training and approval from the Facility Manager.
- Log into your account, click on TOPSPIN icon to start program. Select lowindow icon to open lock display (or type “lockdisp” enter).
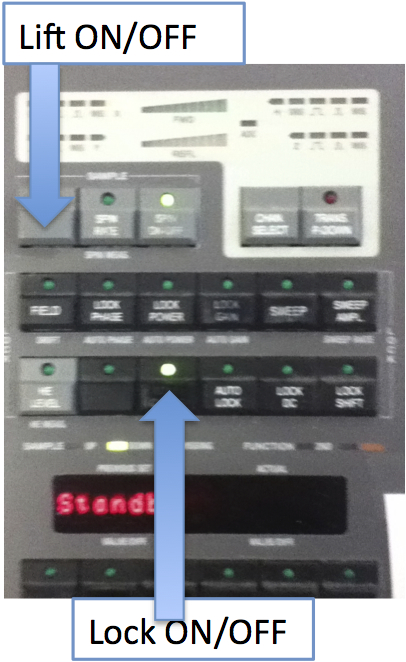
- Press the “ lock” button on the BSMS keypad ( to turn off the lock) and then the “lift on/off” button to eject the sample. Put your sample in a blue spinner and set the sample to correct depth using wall mounted depth gauge. Remove the previous sample from top of magnet and place in you sample. Make sure you can hear the air blowing from the magnet or sample will fall into the maganet and cause damage. Press the “lift on/off” button again to insert sample. Remove the spinner from the previous sample and put the sample in the rack or beaker and the spinner upside down on the desk.
- When the sample light on the BSMS Keypad changes from "missing" to "down' then you can type “new” and enter a file name in the pop-‐up window then save it. File names usually indicate the sample, experiment type and date and they should not contain spaces, use underscores “_” to separate words.
- Type “rpar proton all” to load in proton 1d experiment parameters. Type “ii” initialize interface to reset the hardware to the according to the updated parameters.
- Type “rsh aa_best” to load the updated best shim set.
- Locking: Type “lock” and select the appropriate solvent from the list that appears, wait until the lock signal has stabilized into a sweeping horizontal line about 2/3 the way up the lock window.
- Shimming: to begin shimming, press the “z” button and turn the knob until the lock signal reaches a maximum value (if it goes off-‐screen select the “lock gain” button and turn it until the lock signal is at the 2/3 level of the lock window then reselect the “z” button). When the “z” button has reached its maximum value then select “z2” and turn the knob until the lock signal max’s out. Since the optimal “z” and “z2” values are interdependent you need to go back and forth between “z” and “z2” until no further gains for the lock signal are made.
- TUNING For the DPX300 (yellow) enter “wobb” and wait 15 seconds for the command to set up. On this instrument the tuning has become fragile and overly sensitive to small adjustments therefore if the “dip” in the wobb signal is visible in the window then 1H tuning is not necessary, if needed increase the number of scans to compensate for lowered sensitivity, if the wobb signal is very bad please alert the facility and he will optimize the tuning. For any nuclei other than 1H the tuning should be optimized as usual using the sliders on the probe.
- Type “rga”, automatically sets receiver gain, and then “zg” which zeros any previous data and starts the experiment.
- Processing: when experiment is finished (about 30 seconds) type ”ef” to fourier transform and weight (or apodize) the data for the best combination of signal to noise and resolution.
- Type “apk” to phase the data. Select the “calibrate” button in the toolbar and then place the cursor in the spectrum window and move the cursor to the top of the peak used for referencing the spectrum (either solvent or external agent like TMS) and then click the left mouse button and enter the reference peak shift in the pop up window.
- Enter “abs” to smooth the baseline, this function also automatically does basic peak picking and set up rough integrals. Select the peak pick icon in the toolbar and draw a box or series of boxes that include the tops of the peaks that you want picked, save and return to the normal screen.
- Select the integration icon. Select all of the integrals picked by the “abs” by clicking on the green symbol and then chose the red X beside to delete those integrals. Now select the integral icon and drag the cursor over the peaks of interest to get the integrals. When this is finished save it.
- Selecting the “title” tab will open a text editor window that will allow you to enter a spectrumtitle that will appear on the final printout You can either print by selecting print on the File drop down menu or type “xwinplot” and format the spectrum in that program.
Variable Temperature Experiments using TOPSPIN
This protocol is meant as a reminder as to the steps involved in setting up this type of experiment and in no way replaces the requirement for training and approval from the Facility Manager.
Variable Temperature (VT) NMR experiments are those experiments collected at temperature different than the room (ambient) temperature that the instruments normally operate at.
It is a somewhat time consuming process to change temperatures, equilibrate samples and adjust variables at each temperature and then return the spectrometer to room temperature for the next user therefore individuals wishing to do VT work should consult with the Facility Manager before booking time, VT runs during busy afternoon hours (1-5 pm) are strongly discouraged. Individuals who have not been instructed in VT operation should not attempt to do so without supervision, there are multiple ways that improper operation could damage the probe or even, in the worst case, cause a magnet quench.
When planning a VT run it is imperative that the temperatures used do not exceed the freezing point or boiling point of the solvent, either temperature range can result in tube breakage and probe damage.
Please note that the standard blue spinners are not compatible with temperatures above 40º C or for extended low temperature work( less than -40º C) , please use the ceramic spinners in those cases.
Ask the Facility Manager for the ceramic spinners.
There are two general types of VT experiments, those below the ambient temperature range which require dry N2 gas, liquid nitrogen filled dewar and gas line cooling apparatus and those that are done at temperatures more than 15 degrees above ambient which can be run with the filtered house air.
The low temperature experiment uses the N2 gas that has been cooled by passage through the line immersed in the liquid nitrogen dewar which enters the probe below the sample, between the probe and the sample is a heater and a thermocouple (very close to the sample) that the measures temperature. Temperature control is accomplished by heating the gas sufficiently before it reaches the sample and is an empirical process, in general setting the heater maximum to about 10% with the 6-10 LPM gas flow rate will allow efficient cooling in the -40º C to 10º C range although some adjustments may be required. For high temperature work an air flow of 535 L/hour is required.
Figure 1: Probe
Low Temperature Experiments
- Co-ordinate with the facility manager to find the best time to do the VT experiments and to make sure there is sufficient liquid nitrogen in the dewar for the experiments. Long (ie overnight) low temperature runs are not advised as there is a chance of the liquid nitrogen running out and a loss of temperature control or of damage to the magnet o-rings from the extreme cold that could result in a quench.
- Put in the sample at ambient temperature, lock, shim tune as normally and run a 1D 1H experiment. If all is well with the sample proceed. Type "edte" into the command line in TOPSPIN in a few seconds a window will appear, change the target temperature, set heater max to 10% but don't turn on the heater yet. Turn off spinning for the duration of the low temperature work.
- Turn on the nitrogen gas line and set the wall-mounted flow gauge to ~6LPM. Very slowly lower the N2 cooling coil into the liquid N2 dewar, beware of rapid boiling of the nitrogen will occur on contact causing droplets to spray and overflow is common, safety glasses, work gloves,appropriate footwear (not open toed) and long pants should be worn.
- Remove the house air line from the probe by opening the clip and use the same clip to attach the N2 gas output tube from the cooling coil apparatus. Be very careful the connector on the probe is fragile and damage to it will require probe removal and shipping out for repair, if necessary adjust the position of the dewar to eliminate stress at the connection and use blue strings to support the line.
- Without too much delay return to the computer and turn on the heater (turning on the heater before the cooled nitrogen is present might result in a heat spike, waiting too long after the cooled N2 is attached could result in sample freezing). If the experiments temperature is to be below -20º C set the target temperature in edte to half way between ambient and the target (ie do it in a couple of steps) and allow the system to equilibrate at the intermediate points for few minutes while you double check the gas connection etc. Select the "monitoring " tab of the edte window to track the temperature change making sure that it is proceeding toward the target temperature. If the temperature does not converge to the target fairly quickly consult with Facility Manager, the as flow rate, heater maximum may need to be adjusted or a calibration using the "self-tune" routine may be required.
- When the target temperature is reached allow the sample to equilibrate for 10 minutes then check the tuning and adjust the Z1 and Z2 shims to optimum values. Collect data as you would normally. Now you can re-adjust the target temperature to the next desired value, allow equilibration, retune and reshim for each temperature.
- When data collection is complete return to 20º C in 15-20C steps. Do not switch samples ( the air used in the ejection could result in condensation in the probe). When the sample has reached 20º C allow several minutes for equilibration then look at VT line connection for ice, gently try to remove the gas tube if it is still frozen on do not force it, wait a few more minutes. Remove the N2 gas tube and switch back to the house air line. Remove the cooling apparatus from the dewar and hang on hook provided. Turn down the flow gauge to 0 LPM and turn the valve off on the N2 line.
- If the instrument has been at low temperature for several hours it may be necessary to keep the heater on and higher air flow (ie 535 L/h) for a while as the cold parts of the probe/magnet assembly heat up, monitor the temperature by periodically turning off the heater and watch how far and fast the temperature drops. When booking the instrument for these runs this extra period for equilibration must be taken into account. When the sample stays near to ambient temperature without heating you can switch samples turn off edte and log out.
High Temperature Experiments
- Co-ordinate with the facility manager to find the best time to do the VT experiments.
- For temperatures above 45º C it is imperative that ceramic spinners are used. For temperatures above 90º C it is mandatory to discuss the experiments with the facility manager, no exceptions!! Be aware that during initial temperature equilibration stages there will likely be significant (up to 10º C) overshoot of the target temperature, take this into account particularly in respect to solvent boiling points. Raising the temperature in small steps may reduce this effect.
- Put in the sample at ambient temperature, lock, shim tune as normally and run a 1D 1H experiment. If all is well with the sample proceed.
- Type "edte" into the command line in TOPSPIN, in a few seconds a window will appear. Change gas flow to 535 L/h by clicking on the "+" sign(never turn down this flow rate while at elevated temperatures). Set Max heater value to 10%. Set target temperature and open the temperature monitoring window. Turn heater to on. If you are raising the temperature more than 20º C do it in several steps allowing short equilibration at the intermediate temperatures.
- Watch the temperature monitoring window, the temperature should overshoot the target slightly and the converge to the target temperature within a few minutes. If the temperature oscillates about the target it will be necessary to run the self-tune calibration. It may be necessary to re-run the self tune when the temperature is changed by more than 10º C. When the temperature is reached allow the sample to equilibrate for 10 minutes and then reshim and retune. Collect data as you would normally.
- When you have finished set the target temperature to 20º C and turn the heater off. It may take up to half an hour for the instrument to return to room temperature, you must continue to monitor and you should take this time into account when doing your initial booking. When the temperature has equilibrated back to 20º C you can set the air flow back to 270 L/h and logout.