Most University websites have one single main menu covering the entire site.
On a larger, more complex website it may be necessary to have separate menus that turn on or off depending on the page visited on the website.
For example, the Campus Transformation website uses separate menus. As you navigate that website the left-hand menu changes to reflect the section of the site you are currently viewing. There are separate menus for the Downtown Campus, CEI, the Welcome Centre and others.
Using separate menus makes sense in this example because there is content related to the overall topic of Campus Transformation in the main menu but there is also specific content related to each building or initiative.
To the user, it appears as though they are on different sites with different menus when they are actually on one site.
For the editor, it allows you to break up your main menu and section content into discrete areas.
Setting up secondary menus is a more advanced Drupal task. You should have a good familiarity with Drupal including working with Blocks before you attempt this procedure on your website.
To create separate menus you must first set up your main menu in the following format:
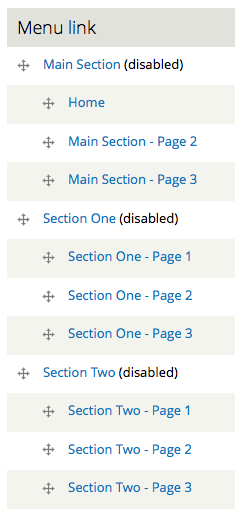
Set parent items as your section titles and set them to be disabled so they don't actually show in the displayed menu. The child items should be enabled as they will show to the user.
For example, the Finance department might have Finance as the main section, and then Accounts Receivable and Accounts Payable as additional sections. Inside of the sections, there could be any number of pages.
The important point to remember is that only the second level items and lower will show to the user.
Once you have your main menu built in that format you swap out the main menu for a menu block that only shows the second level.
Go to Structure-->Blocks-->Add a menu block.

You do not need to specify a Block title, Administrative title, the default menu being used or the Maximum depth.
Leave all those fields in their default settings.
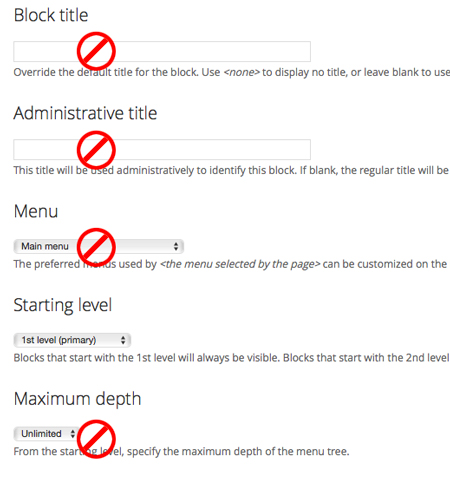
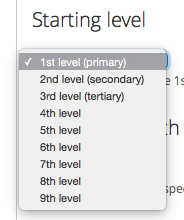
The only thing to change is the Starting level. From the drop-down menu change from 1st level (primary) to 2nd level (secondary).
Scroll to the bottom of the page and Save Block.
You have now created another menu that copies all the items from the main menu but only shows the second level.
Now you need to switch your main menu to the new block.
Go to Structure-->Blocks to see your Block listing.
The current Main menu will be enabled. It will be in the Menu Section region.

The new menu block you just created will be called "Main menu (levels 2+)" and it will be in the disabled section of your Block listing.

Set the Main menu region to None which will disable it.
Set the Main menu (levels 2+) region to the Menu Section, essentially swapping the two menus.
Scroll to the bottom and select Save Blocks.
Now, as the user moves through the site they will only see the section menu (secondary menu items) and the menu will change as they navigate to different sections on your website.